CLICK HERE FOR FREE BLOGGER TEMPLATES, LINK BUTTONS AND MORE! »

Easter CupCakes with my Girls (2012)

I love baking and my girls love baking with me.  Today we decided to celebrate Easter by making cupcakes to share with the family tomorrow.  We started out by using some simple store bought ingredients.  For the grass I used sweetened coconut and added a few drops of food coloring:


Then we mixed everything according to the package directions for cupcakes.  I omitted the oil and used 1/4 cup of applesauce though.


Finally, after they were all cooled, we decorated them, which of course was the best part!


~~Lemonade Part Cake~~


Lemonade Party Cake


Lemonade Party Cake
 
 
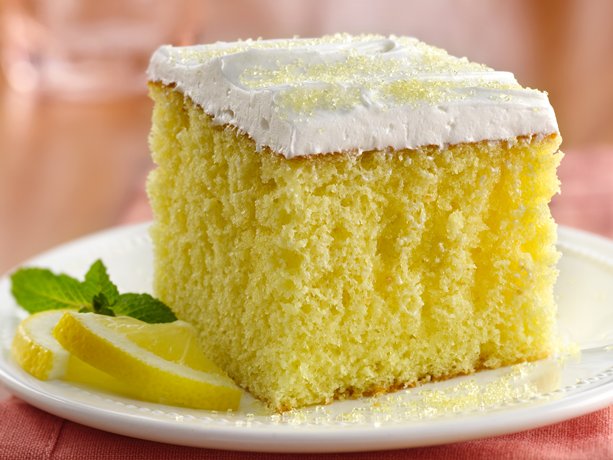
When life hands you lemons, make lemonade cake! This moist lemon cake drizzled and filled with an easy lemon filling will remind you of summer any time of year.


Prep Time:  20 minutes    Total Time:  3:10   Makes 12 Servings


1 box Betty Crocker® SuperMoist® lemon or yellow cake mix
Water, vegetable oil and eggs called for on cake mix box
1 can (6 oz) frozen lemonade concentrate, thawed
3/4 cup powdered sugar
1 container Betty Crocker® Whipped fluffy white or fluffy lemon frosting
Yellow colored sugar, if desired
 
 
  1. Heat oven to 350°F (325°F for dark or nonstick pan). Make cake as directed on box for 13x9-inch pan. Cool 15 minutes.
  2. Mix lemonade concentrate and powdered sugar. Pierce top of warm cake every 1/2 inch with long-tined fork, wiping fork occasionally to reduce sticking. Drizzle lemonade mixture evenly over top of cake. Run knife around sides of pan to loosen cake. Cover and refrigerate about 2 hours or until chilled.
  3. Spread frosting over top of cake. Sprinkle with colored sugar. Store covered in refrigerator.
Makes 12 servings
 
 
Make the Most of This Recipe With Tips From The Betty Crocker® Kitchens
A fun way to enjoy Lemonade Party Cake is at a Lemon Party! Make lemon the flavor and decoration theme for your next get-together, and serve up lemon-inspired dishes such as this cake along with plenty of ice-cold lemonade.
 
 
Nutrition Information:
1 Serving (1 Serving)
  • Calories 410
    • (Calories from Fat 160),
  • Total Fat 18g
    • (Saturated Fat 4 1/2g,
    • Trans Fat 2g),
  • Cholesterol 55mg;
  • Sodium 310mg;
  • Total Carbohydrate 62g
    • (Dietary Fiber 0g,
    • Sugars 45g),
  • Protein 2g;
Percent Daily Value*:
  • Vitamin A 0.00%;
  • Vitamin C 2.00%;
  • Calcium 8.00%;
  • Iron 4.00%;
Exchanges:
  • 1 Starch;
  • 0 Fruit;
  • 3 Other Carbohydrate;
  • 0 Skim Milk;
  • 0 Low-Fat Milk;
  • 0 Milk;
  • 0 Vegetable;
  • 0 Very Lean Meat;
  • 0 Lean Meat;
  • 0 High-Fat Meat;
  • 3 1/2 Fat;
Carbohydrate Choices:
  • 4;
*Percent Daily Values are based on a 2,000 calorie diet.

Allergy Season Is Here~Get a $4 Off Coupon for Alaway

Product boxAllergy Season is among us and that means itchy, red watery eyes.  Print a coupon for $4 off Bausch & Lomb Alaway by going to their website here.

~FREE Sample of Gevalia House Blend~


Gevalia is offering a free sample of their new House Blend available at Walmart and Target.  Just go to their Facebook page and click "like".  Hurry as quantities are limited though.


Get Your Free Sample Here

~Healthier Banana Bread~

Here is  a great recipe for banana bread that uses honey, applesause and whole wheat flour making it healthier and tastier!


Ingredients

  • 2 cups whole wheat flour
  • 1 teaspoon baking soda
  • 1/4 teaspoon salt
  • 1/2 cup sugar free applesauce
  • 3/4 cup honey
  • 2 eggs, beaten
  • 3 mashed overripe bananas

Directions

  1. Preheat oven to 350 degrees F (175 degrees C). Lightly grease a 9x5 inch loaf pan.
  2. In a large bowl, combine flour, baking soda and salt. In a separate bowl, mix together applesauce and honey. Stir in eggs and mashed bananas until well blended. Stir banana mixture into flour mixture; stir just to moisten. Pour batter into prepared loaf pan.
  3. Bake in preheated oven for 60 to 65 minutes, until a toothpick inserted into center of the loaf comes out clean. Let bread cool in pan for 10 minutes, then turn out onto a wire rack.

(Thanks 8 Weeks To A Better You for this recipe!)

~Green Mountain Coffee Deal of The Week~Supplies Limited


Deal of the Week


Get Your Savings by going to Green Mountain Now!!

~Lipton Tea~FREE Sample of Tea & Honey Mix


Lipton Tea is offering free samples of their new Tea And Honey Mango Pineapple Mix (while supplies last) by liking their Facebook Page.  You can request your free sample by going here!

Spring Beauty Bag FREE From Target

Target is still giving away a FREE Spring Beauty Bag by just liking their Facebook Page and signing up!  Hurry as quantities are limited.  I just signed up for mine :)


Head On Over To Targets Facebook Page Now!

Mini "Mimosas" by Jello


WHAT YOU NEED

1/4 cup boiling water
1 pkg. (3 oz.) JELL-O Orange Flavor Gelatin
1/3 cup cold club soda
  fresh strawberries, each cut crosswise into 5 slices


MAKE IT

  1. Add boiling water to gelatin mix in small bowl; stir 2 min. until completely dissolved. Stir in club soda.
  2. Place strawberries in 10 (2-oz.) plastic cups sprayed with cooking spray; fill with gelatin. Refrigerate 1 hour or until firm.
  3. Unmold before serving.

KRAFT KITCHENS TIPS

SubstitutePrepare using JELL-O Sugar Free Gelatin.
SubstituteSubstitute boiling orange juice for the boiling water.
Variation Cut each strawberry into 5 wedges instead of slicing it. Prepare gelatin mixture as directed; pour into 2-oz. plastic cups sprayed with cooking spray. Refrigerate 10 min. Insert strawberry wedge into gelatin in each cup. Refrigerate 1 hour or until firm.


You can find this recipe and more just like it by going to Kraft!


Tie-Dye Fruity Cupcakes from Jello


WHAT YOU NEED

1 pkg.(2-layer size) white cake mix
1/4 cupdry JELL-O Lemon Flavor Gelatin (1/2 of 3-oz. pkg.)
1/4 cupdry JELL-O Lime Flavor Gelatin (1/2 of 3-oz. pkg.)
1/4 cupdry JELL-O Strawberry Flavor Gelatin (1/2 of 3-oz. pkg.)
1 container(16 oz.) ready-to-spread vanilla frosting


MAKE IT
  1. Prepare cake batter as directed on package; divide evenly into 3 bowls.
  2. Stir different flavor dry gelatin mix into batter in each bowl. Alternately spoon batters into 24 paper-lined muffin cups, adding about 2 Tbsp. of each batter to each cup. Bake as directed on package for cupcakes. Cool completely.
  3. Pipe frosting onto cupcakes. (See tip.)

KRAFT KITCHENS TIPS

How to Pipe FrostingInsert desired decorating tip in pastry bag. Fold down top of pastry bag about halfway, forming a cuff. Spoon enough frosting into bag to fill halfway. Unfold cuffed top and twist bag until it meets level of frosting in bag, To pipe, hold bag firmly and squeeze from top of bag, keeping bag twisted to prevent frosting from leaking out from top of bag. If you don't have a pastry bag, you can use a resealable plastic bag instead. Spoon frosting into bag, then cut piece off one corner of bag. Twist top of bag as directed, then use to pipe frosting onto cupcakes.
How to Use the Remaining Dry Gelatin MixesCombine leftover dry gelatin mixes in medium bowl. Add 1-1/2 cups boiling water; stir 2 min. until mixes are completely dissolved. Stir in 1-1/2 cups cold water. Refrigerate several hours or until firm.
Variation Prepare as directed, substituting 1 tub (8 oz.) thawed COOL WHIP Whipped Topping for the canned frosting. Sprinkle with remaining dry gelatin mixes. Keep refrigerated.


Find this recipe and more at Kraft!

FREE Cake Mixes Cookbook (Gooseberry Patch)

Get your free Kindle download of Gooseberry Patch Cake Mixes.  You can find this book by going to Amazon's website Here~

Indoor Garden Using Plastic Bottles


Here was a project I started a few weeks ago and it has taken off beautifully!  With that unusually warm week we had back in March, I felt like getting my vegetable plants started.  So I used some pop bottles that I cut down a little more than half way.  I just added some soil and the seeds and watered them.  And before I knew it, within about a week they started sprouting.  This is a great eco friendly way to recycle and get your garden started at the same time. 

Mini Cardamom Cream Cakes by Better Recipes


Ingredients:
2 cupsFlour
1 cupSugar
2 tspBaking Powder
1 tspGround Cardamom
⅛ tspSalt
3Eggs, at room temperature
1½ cupsHeavy Whipping Cream
Powdered Sugar
Blueberries, for garnish

Directions:
Preheat oven to 350 degrees. Coat mini bundt pans with non-stick cooking spray. In a large bowl of an electric mixer, combine the flour, sugar, baking powder, cardamom, and salt. Blend in the eggs at low speed. Add the cream and beat at high speed, scraping the bowl, until the batter is the texture of softly whipped cream. Turn the batter into the prepared pan. Bake for 40 to 50 minutes or until a wooden skewer inserted into the center of the cake comes out clean. Cool for 5 minutes in the pan. Invert onto a rack and cool completely. Dust with powdered sugar and garnish with blueberries before serving.
Makes 6 mini bundt cakes. Can also be prepared using one regular sized bundt pan and will bake for 50-60 minutes.
Kristina_Vanni
Recipe By: Kristina_Vanni


Thanks to Better Recipes for this great recipe!

Upcycled Projects and Crafts from Country Living


Here are just a few of the ideas from Country Living I have listed for you.  You can find out more information by going to their website.

Mason Jar Soap Dispenser

Repurpose the classic Mason jar as a soap or lotion dispenser in your bathroom.
1. First, measure and mark the center of the jar's lid.
2. Using a 1/2" high-speed steel drill bit (about $10; local hardware store), drill a hole to fit the width of a soap dispenser pump. We used pumps from old lotion bottles.
3. Fill the jar with liquid soap, screw the lid back on, and insert the pump. You may need to trim the bottom of the pump to fit your jar.


Read more: Upcycled Crafts and Projects - Easy Upcycling Craft Ideas - Country Living


Crate Shelving

Old blueberry crates — like the six that make up this ruggedly good-looking shelving uni — are the perfect size for displaying and storing Mason jars.
1. Find a pattern/layout you like by arranging the crates on the floor.
2. Mount the crates on a wall, starting with the top row, using a level, anchors, and screws. For each box, drill holes through each of the four corners, then insert anchors into the holes. Holding the box in place so that the holes align, drill screws through the holes to affix the box to the wall.


Enter The Country Crafts Sweepstakes

Spring Craft Ideas from Country Living

Inspired by color and flowers, these simple projects will put you in the mood for cheery spring!


Country Living

~Empanadas~

~I absolutely love spanish food! This is one of my favorites to make and I have found this simple recipe to share with you.


Empanadas

Ingredients

  • 1/2 cup finely diced onion
  • 1/4 cup finely diced green pepper
  • 1/2 pound lean ground beef
  • 1 medium potato, peeled and diced
  • 1/4 cup raisins
  • 1/2 cup beef broth
  • 1/4 cup diced green olives
  • 1-1/2 teaspoon Spice Islands Cumin, Ground
  • 1 teaspoon Spice Islands Paprika
  • 1/2 teaspoon Spice Islands Pepper, Black Fine Grind
  • 1 hard cooked egg, chopped
  • 1 egg, lightly beaten
  • unbaked pie crusts, 3 sheets
  • 1 tablespoon corn oil

Directions

Heat oil in large skillet. Add onion and green peppers; cook until tender. Crumble in ground beef and cook until nearly cooked through.

Add potato, raisins and beef broth; reduce heat. Cover and cook 10 minutes. Stir in olives, cumin, paprika and black pepper. Continue to cook 5 minutes, stirring occasionally. Remove from heat and stir in egg. Spread on a shallow tray/pan and refrigerate for 30 minutes.

Lightly sprinkle counter with flour and roll each crust to 1/4-inch thickness. Cut in 4-inch circles (can use a small bowl and cut around edges with a sharp knife). Reroll dough scraps.

Lightly brush egg over interior edges of each wrap. Holding wrap in one hand place about 2 tablespoons filling in center of wrap lightly pressing edges to seal. Place on baking tray and seal edges of empanada with a fork. Continue with remaining wraps and filling.

Bake at 400°F for 10 minutes, brush with additional egg wash and bake an additional 7 to 12 minutes until browned.

Recipe Note: Empanada wraps can be found in large grocery stores or Latin markets. For best results, deep fry the empanadas.


Quick Facts

Prep Time
1 hour
Cook time
20 minutes
Chill Time
30 minutes
Bake Time
15 to 20 minutes


Yields:
30 empanadas


Find This Recipe and More at Spice Islands

Ham & Pepper Wraps~Weight Watchers

Disclaimer: Weight Watchers is a registered trademark of Weight Watchers International Inc. Points and PointsPlus are trademarks of Weight Watchers International Inc. Authentic information about the program is only available at your local Weight Watchers meeting. This site is not affiliated with Weight Watchers International in any way and Weight Watchers has not reviewed this site for accuracy or suitability for WW members. Information on this site is based on recollections and assumptions of its author and is not warranted for any purpose by its author. All readers are encouraged to go to a Weight Watcher’s meeting for actual WW info. This site is presented under the rights of the First Amendment; rights worth fighting for. All information is intended for your general knowledge only and is not a substitute for medical advice or treatment for specific medical conditions. You should seek prompt medical care for any specific health issues and consult your physician before starting a new fitness regimen.
Ham and Pepper Wraps
Recipe Categories
PointsPlus+ = 1
Ingredients

1 each red and green bell pepper
2 tbsp Neufchatel cheese, softened
12 slices "Oscar Mayer Deli Fresh Smoked Ham"


Directions:

1. Cut peppers in half, lengthwise; remove and discard seeds.
Cut each piece into three lengthwise strips.

2. Dry out the inside of peppers with paper towels; spread with the cheese.

3. Place one pepper strip on each ham slice; wrap ham around pepper.
Secure with wooden toothpicks.

Yield: 12 wraps (4 servings)
Serving Size = 3 per serving

Weight Watchers PointsPlus+ = 1 per Serving

Nutrition Information:
Calories 50, Carbs 4 g, Fat 2.5 g, Fiber 1 g, Protein 5 g

You've Been Egged~Free Printable


You've Been Egged


Have you ever been ‘egging’ before?
No, not that kind ‘egging’. I have never done that before.
Right mom? :)
I’m talking about ‘egging’ your neighbor or friend’s houses with plastic eggs filled with goodies. Last year I used this free printable from Eighteen 25. But, now that I have a place to share my printables, I have created one with a little more fun added to it.

All you need to do is…
1) Print out this free 8.5×11 printable.
2) Fill a bunch of plastic eggs with candy or other goodies.
3) Figure out when your neighbor or friend will be gone for a bit.
4) Have your kiddos spread plastic eggs all over their yard and then leave the note on their door!
You could just add candy, but if you really like your neighbor or friend, then you could add some special things to some of the eggs and let them know on the note what they should be looking for!
Some ideas would be….
Dimes, Quarters, $1 Bills (or more if you roll like that).
Gift Certificates (you could just add one $2 or $3 certificate to a favorite ice cream shop or it could be a homemade one that is good for a batch of homemade cookies).

Free Printable Download from Plumadorable.com!

50% Off Select Leapfrog Leapster 2 Learning System and Games

For Today Only, Amazon is offering 50% off on select Leapfrog Leapster 2 games and learning systems!


LeapFrog Leapster 2 Learning Game System - Green

LeapFrog Leapster Learning Game Disney Fairies
LeapFrog Leapster Learning Game SpongeBob SquarePants Saves the DayLeapFrog Leapster 2 Learning Game System - Pink


Go Here For Amazon's Deal of the Day

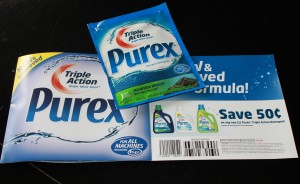
FREE Purex Sample

Purex is offering a free sample of their new  product Ultra Packs.   All you have to do is click the following link to request your free sample!


Get Your Free Sample Here

History of Decorating Easter Eggs

History of Coloring Easter Eggs
Image by Cool Text: Logo and Button Generator - Create Your Own Logo


The Tradition of coloring easter eggs goes back all long time.  As far back as the ancient daysof Rome, eggs were colored using natural dyes as a way to celebrate the transition of winter into spring. 


Eggs have been a symbol of fertility, new life, and birth, and were adopted sometime during early Christian history as a symbol of the resurrection of  Jesus from the dead after his crucifixion (http://ashleyanderson.suite101.com/the-history-of-coloring-easter-eggs-a361874). 


The History Channel reports that, from the perspective of Christianity, eggs have come to represent Jesus leaving his tomb and being resurrected, despite eggs not appearing as a religious symbol in the Bible.
Coloring eggs for Easter dates back to the thirteenth century, when it is believed that eggs may have been a food that was forbidden during the Lenten season due to the significance it took on in regards to Jesus. Christians would decorate eggs during Lent and then, once Lent ended on Easter morning, would eat the eggs.
Eggs were traditionally decorated in bright colors to symbolize the colors and brightness of spring, says Fabulous Foods. Different cultures would decorate eggs in different ways, such as the Greek Orthodox coloring eggs a dark red color and baking them in breads to symbolize the blood of Christ, or the Germans using ferns, leaves, and flowers to create different stenciling effects on eggs.
Additionally, more elaborate Easter eggs emerged as the art of decorating Easter eggs evolved throughout the years. The Ukranian art of Pysanki eggs, or eggs that were decorated by layering melted beeswax and dye in various designs to create the pattern on the egg shell. The Russians also became known for the Faberge egg, or an elaborately designed egg that was turned into various kinds of trinkets (http://ashleyanderson.suite101.com/the-history-of-coloring-easter-eggs-a361874).


Modern Ways of Coloring Easter Eggs

Today, Easter eggs are typically blown, or removing the egg's contents by blowing them out of a tiny hole in the shell, or are hard boiled prior to decorating. Blown Easter eggs can be carefully preserved and displayed year after year, while hard boiled Easter eggs are often eaten or included in a variety of Easter dinner dishes.
Eggs are decorated in a variety of ways, either by using markers, crayons, and stickers to egg dyes to paints to eco-friendly egg coloring dyes that are made out of household goods. Pysanki eggs and Fabrege eggs, which have become increasingly rare, are sold at auction for large sums of money.
Easter eggs have come a long way since their original role as a pagan symbol of spring. Today, coloring Easter eggs has become a family tradition that children, adults, artists, and everyday people can enjoy to celebrate Easter and the spring season.


Sources

  • "Easter Symbols." The History Channel. History.com, copyright 1996-2011, accessed 26 March 2011.
  • "Faberge Introduction." PBS. PBS.org, accessed 26 March 2011.
  • Sicard, Cherie. "The History of Easter Eggs" Fabulous Foods. Fabulousfoods.com, accessed 26 March 2011.


Read more at Suite101: The History of Coloring Easter Eggs | Suite101.com http://ashleyanderson.suite101.com/the-history-of-coloring-easter-eggs-a361874#ixzz1qo7pi8PJ


Read more at Suite101: The History of Coloring Easter Eggs | Suite101.com http://ashleyanderson.suite101.com/the-history-of-coloring-easter-eggs-a361874#ixzz1qo7VQgam

Get More Information by Clicking Here

Make Your Own Laundry Soap

How to make homemade laundry soap:

First you will need the following ingredients (you can find these at your local grocery store):


  • 1/2 Cup: Arm & Hammer Super Washing Soda {not Baking Soda}
  • 1/2 Cup: Borax
  • 1/3 Bar of Fels-Naptha Soap {you could also use Ivory soap, but if using Ivory… use the whole bar}
  • Bucket {2 gallon size or larger}
  • Empty laundry detergent containers or bucket with lid to store detergent.

  • What you are going to do is: 
    • Grate 1/3 bar of Fels-Naptha Soap over large pot or saucepan

    • Add 6 cups of Water.
    • Heat over medium-high until soap dissolves and melts.
    • Add Washing Soda & Borax, and stir until dissolved.
    • Remove from heat and set aside.
    • Pour 4 cups Hot Water into bucket, then add Soap Mixture.
    • Stir, then add 1 Gallon + 6 Cups of additional water. Stir.
      Transfer to a bucket with a lid, or pour into empty laundry detergent containers.
    • Set aside, and let it sit overnight, or up to 24 hours, to thicken and gel up.
    • Consistency and color will vary depending on your soap & water ~ it may be lumpy and watery… kind of like a watery gel, but it works great!
    • Stir or shake before each use, as it will continue to gel.
    Good job… you did it!

    I have made this personally and it works really well!  You can also find out how to make homemade fabric softner by clicking HERE.

    ~Thanks to: Frugal Girls!  


    Read more: http://thefrugalgirls.com/2010/08/how-to-make-homemade-laundry-detergent.html#ixzz1qlBYcCDZ

    Cleaning The Bathroom With Vinegar

    Vinegar Tips: Cleaning the Bathroom

    Today I'm excited to share 6 ways to use vinegar in the bathroom!

    #1 Drains: deodorize & unblock
    I'm sure you've all noticed that at times the bathroom drain can stink. If you want to know what the awful smell is then you can read this post, but if you don't want to know what it it, you just want to get rid of it then here's a great tip for you. "Using a funnel, pour 1/2 cup of baking soda followed by 1 cup of white vinegar down the drain. When the foaming subsides, flush with hot tap water. Wait 5 minutes and then flush again with cold water. This will kill [the] odor-causing bacteria" without having to use any harsh chemicals.
    If you're drain has been running a little slower than normal "pour in 1/2 cup of salt followed by 2 cups of boiling white vinegar. Flush [down the drain] with hot and cold tap water " {same as above}.

    #2 Bathtub/Shower
    To keep the bathtub/shower clean keep a spray bottle of vinegar and a sponge in the shower and spray it down every couple of days. This will eliminate the build up of bacteria and keep the shower extra shiny!

    #3 Toilet Bowl
    To clean the toilet bowl and get rid of that awful water ring, that's just above the water line, "pour 2 cups of white vinegar into the toilet bowl and let the solution soak overnight before flushing."

    #4 Hard water spots
    "To remove hard water spots from sinks, showers and baths, wipe using a cloth soaked in full-strength vinegar. Allow to stand for about 5 minutes and then rinse with water."
    Another great way to stay on top of water spots is to keep a spray bottle of white vinegar in the bathroom and just before brushing your teeth, going to the bathroom, etc. spray the bathroom fixtures down with vinegar and then when you are finished brushing your teeth, etc. rinse the fixtures with cold water and dry them off with the hand towel.

    #5 Jacuzzi tub
    It's important to clean jacuzzi tubs and to keep the jets clean and free from bacteria and clogging. To clean a jacuzzi tub fill it up and "pour about 4 1/2 liters of white vinegar into the water." Run the vinegar/water mix through the jets for a few minutes, then drain the tub and wipe it clean.
    Do this at least once a year, I recommend every 6 months as part of your Spring Cleaning and Fall Cleaning routines.

    #6 Vinyl Floors
    To keep vinyl floors clean scrub them with a mixture of "1/2 cup of white vinegar in a bucket of hot water." "Not only [will] this keep the floors shiny but it kills dust mites." Woo-hoo for tackling 2 tasks with one chore!
    Courtesy of:  AskAnnaMoseley

    Polka Dot Tiered Planters

    Polka Dot Tiered Planters
    By going to Positively Splendid You can find out how to create these adoreable polka dotted planters!

    How To Build An Outdoor Garden Water Fountain

    Live outside

    Do you have a great deck or patio? How about sprucing it up a bit and making an effort to spend more time outdoors? Hang paper lanterns from your trees. Redesign your patio with some comfortable outdoor furniture, potted plants and a snazzy outdoor rug. Build a gorgeous outdoor water fountain. Plant a beautiful garden that the whole family will enjoy looking at all summer long. Fire up the grill and make your meals outdoors so you can take advantage of everything this fabulous season has to offer.
    Water fountains can bring that extra something you need to your outdoor garden.  Lowe's has an easy step-by step video of how to make your own. 


    DIY Simple Easter Basket Crafts

    Fine Print

    Give guests a sweet send-off with cookies in craft-store berry baskets. Tape patterned scrapbook paper to baskets, and use the same paper for hangtags attached with twine


    Top Tiers

    To make this tower of treats, tape cut-to-fit craft paper around two empty 32-oz. yogurt cartons. Hot-glue an upside-down carton inside a large orchard basket (crateandbasket.com), then glue a medium basket on top. Repeat with other carton and small basket. Fill with faux grass and goodies.


    Paper Posies

    Overflowing from a vintage wire egg carrier, these coffee-filter flowers are a charming way to welcome brunch visitors.

    Coffee Filter Flowers: The Steps

    For each flower you'll need:
    • 2 white basket-style coffee filters
    • 1 brown basket-style coffee filter
    • 12" floral wire
    • Hot glue
    • 10" green grosgrain ribbon (3/8" wide)

    Instructions:
    • Place two white filters together (one on top of the other), fold in half, then fold in half again
    • Starting at the outside corners, draw a curved V-pattern onto the front to form petal shapes (see pattern A); cut out
    • Repeat folds on third white coffee filter, and draw a smaller curved V shaped (see pattern B); cut out
    • Repeat folds on two brown coffee filters (placed one on top of the other, then draw several V-shapes (see Pattern C); cut out
    • Open up all filters so they are flat to reveal petal shapes
    • Layer them as so: Pattern A filters on bottom, Pattern B filter in middle, Pattern C filters on top
    • With you 12" section of floral wire, poke two holes through all the center of the layers, about 1/4 inch apart
    • Loop wire even through holes (entering from top), then twist wire underneath the base of the petals, securing tightly.
    • Starting from the bottom, wrap wire with ribbon, secure with glue gun
    • Tie the remaining ribbon into a bow at the flowers' base
    • Fluff petals


    Gathering Moss

    Showcase twine-wrapped and paper-embellished eggs with this woodsy, moss-covered creation. Simply hot-glue craft-store moss to an inexpensive basket; for the eggs, use a glue stick to add petals, polka dots, bunnies, and string.


    Easter Peat Pot Baskets

    Materials:
    • Peat pots
    • Acrylic craft paint (off-white and pastel)
    • Paintbrush
    • Lollipop sticks or wooden skewers
    • 18-gauge floral wire
    • 20-gauge floral wire
    • Wire cutters
    • Perfect Glue 1
    • Two clothespins per basket
    • Embellishments such as flowers and ribbon. (Animals and chocolate bunny not included.)

    Instructions:
    • Paint interior and exterior of the peat pots off-white. Once fully dry, use the end of a lollipop stick or wooden skewer to make polka dots on pots with a pastel paint. (Use paint sparingly.)
    • For handles, cut the 18- and 20-gauge wires into 12-inch pieces; wrap the 20-gauge wire around the 18-gauge wire. Bend wire into a handle shape and use glue to attach wire to the interior sides of each peat pot; secure with clothespins.
    Dry for one hour before handling. Once dry, use glue to apply embellishments to pots as desired.


    Bed of Roses


    Tightly packed blossoms form the base of this basket.
    Step 1: Place soaked floral foam on a teacup saucer and insert rose stems to create the base.
    Step 2: Insert dried grapevines to form a handle. Decorate the grapevine by wrapping it with a satin ribbon, finished off with a bow.
    Step 3: Fill the basket with plastic "bejeweled" eggs: With a spiral motion starting at the top of each egg, tightly wrap a long string of beads (found at craft stores) around the egg, affixing it with glue.